

Turning Social Media Traffic into Shopify Orders: A Practical Checklist
A practical checklist for diagnosing a social campaign that brought visits but no Shopify orders, from tracking and landing pages to product pages and checkout.
- Published
- 9 Nov 2026
- As of
- 2 Nov 2026
You ran a first social campaign and got clicks but no orders. This checklist walks through the places to look, in the order a shopper meets them: tracking, landing page, product page, then checkout. It is for merchants who want to know what to ask, and developers who will fix it.
Start with tracking, so you can trust what you see
Before you judge a campaign, check that you can see it. If Shopify and the ad platform aren't recording sessions and actions, a quiet week tells you nothing. Start in the marketing summary, which shows sessions, conversion rate and average order value (AOV). Then open the conversion reports, which cover marketing activities created in Shopify and marketing apps. If sessions are there but orders aren't, you have a conversion problem. If sessions are missing, you have a tracking problem, and that needs fixing first.
Next, look at how your pixels are added. Shopify's pixels documentation describes two routes: app pixels, installed through marketing and data collection apps, and custom pixels, which a developer adds by hand in the pixels manager. App pixels are quicker to set up. Custom pixels give you control, which helps when you want a specific event sent to a specific platform. Pixels load on the storefront, checkout, thank you page and order status page. Shopify also says you can track common actions with a conversion tag or Meta pixel.
Know the limits. Pixel scripts run in a secure sandbox, so they can't render buttons, forms, banners or modals, and they can't automatically detect page scrolling. Google Tag Manager can run as a custom pixel, but anything it loads is still sandboxed, with the same limits. Standard events such as page views, product views, cart updates, purchases and searches work. Link clicks and form interactions need publishing as custom events with Shopify.analytics.publish(). If your campaign depends on a signup form or an outbound link, add those events deliberately.
Consent matters too. In markets that require it, usually the EEA and the UK, web pixels run only when visitors have given the permissions the pixel needs. New pixels ask for Marketing and Analytics permissions by default. Pixels set up as data sale won't run for people who opted out, unless the pixel supports limited data use. So a gap between ad clicks and recorded sessions can be partly down to consent, not a fault.
Our tip: do a test visit before you spend more. Click through from the ad on your phone, browse a product, add it to the cart and reach checkout. Then confirm each step shows up in Shopify and in the ad platform. Try it once with consent declined and once accepted, if you sell to consent markets. It takes minutes and saves you from optimising against bad data.
Read the reports before changing anything
Before you touch a theme or rewrite an ad, read what Shopify already tells you. Open Reports in the admin and use the default ones. These are pre-formatted and ready to use, and Shopify's reports documentation says you can filter the Reports list by Created by and pick Shopify to see only the defaults. That keeps custom reports from other apps or teammates out of the way.
Then work through the Acquisition, Behavior, Marketing and Sales categories in that order. You are looking for the point where people stop. Did they arrive from the campaign? Did they view products? Did they add to cart? Did anyone start checkout? The marketing summary, described in Shopify's guide to analysing marketing campaigns, shows sessions, conversion rate and average order value (AOV) for each channel. Conversion reports also cover marketing activities created in Shopify and in marketing apps.
This tends to help because the drop-off point tells you which part of the checklist to fix first. No sessions from the campaign points to tracking or the ad link. Sessions but few product views points to the landing page. Product views without add to cart points to the product page. Carts without orders points to checkout. Here is a practical tip: write down how many sessions arrived from the campaign, then put that beside product views. A big gap between the two is your first clue, and it saves you from redesigning pages that people never reached.
Landing page and speed on a phone
Most social traffic arrives on a phone, so treat the mobile landing page as the real storefront. Link to the specific product or collection the ad showed, not the homepage. Someone who tapped an ad for one thing shouldn't have to hunt for it. The headline, image and offer should match what they just saw. That tends to help because a visitor who sees a mismatch has little reason to keep looking.
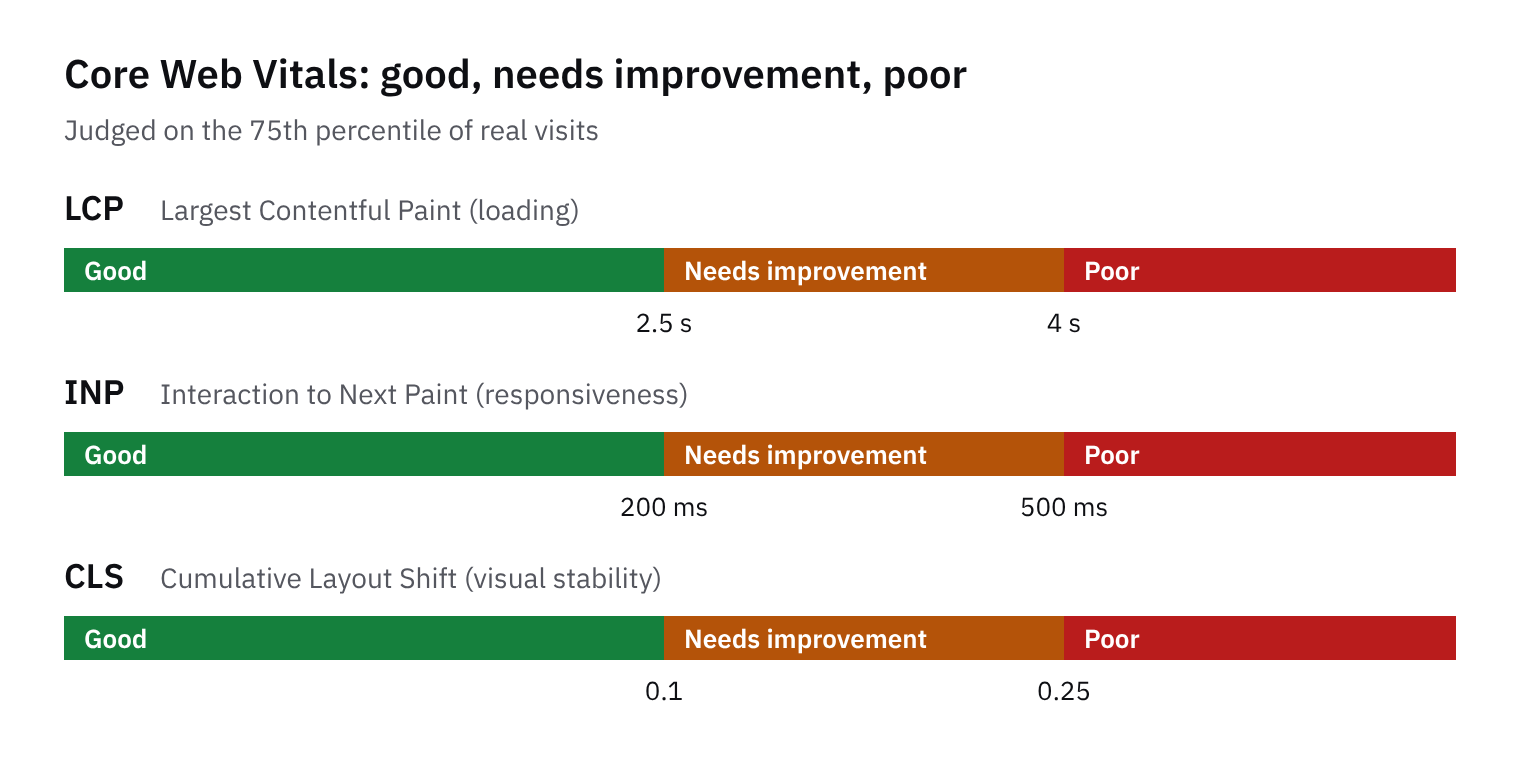
Then check speed with Core Web Vitals, Google's set of three page experience measures. According to web.dev, LCP (loading) should occur within 2.5 seconds of the page starting to load. INP (interactivity) should be 200 milliseconds or less. CLS (visual stability) should be 0.1 or less. The recommended way to judge them is the 75th percentile of page loads, segmented across mobile and desktop. So look at the slower end of your real visitors, not the average.
Field data matters more than a lab run. web.dev says lab measurement is not a substitute for field measurement, because performance varies by device, network and user interaction. Lighthouse can't measure INP at all, since a simulated load has no user input. Total Blocking Time is the lab proxy. The Chrome User Experience Report gives you real-user data without extra instrumentation, and the web-vitals library measures each metric by calling a single function.
Your theme and what you bolt onto it set the starting point. The Shopify Help Center notes that themes bring different styles, layouts and experiences, and that you can customise them to fit your brand. The Theme Store has free and paid options. Pick one that suits your products, then be sparing with changes. Every third-party script and app block adds weight, so audit what loads on the landing page and remove anything that isn't earning its place. We'd test on a mid-range phone over a normal mobile connection before spending more on ads.
Make the product page easy to buy from
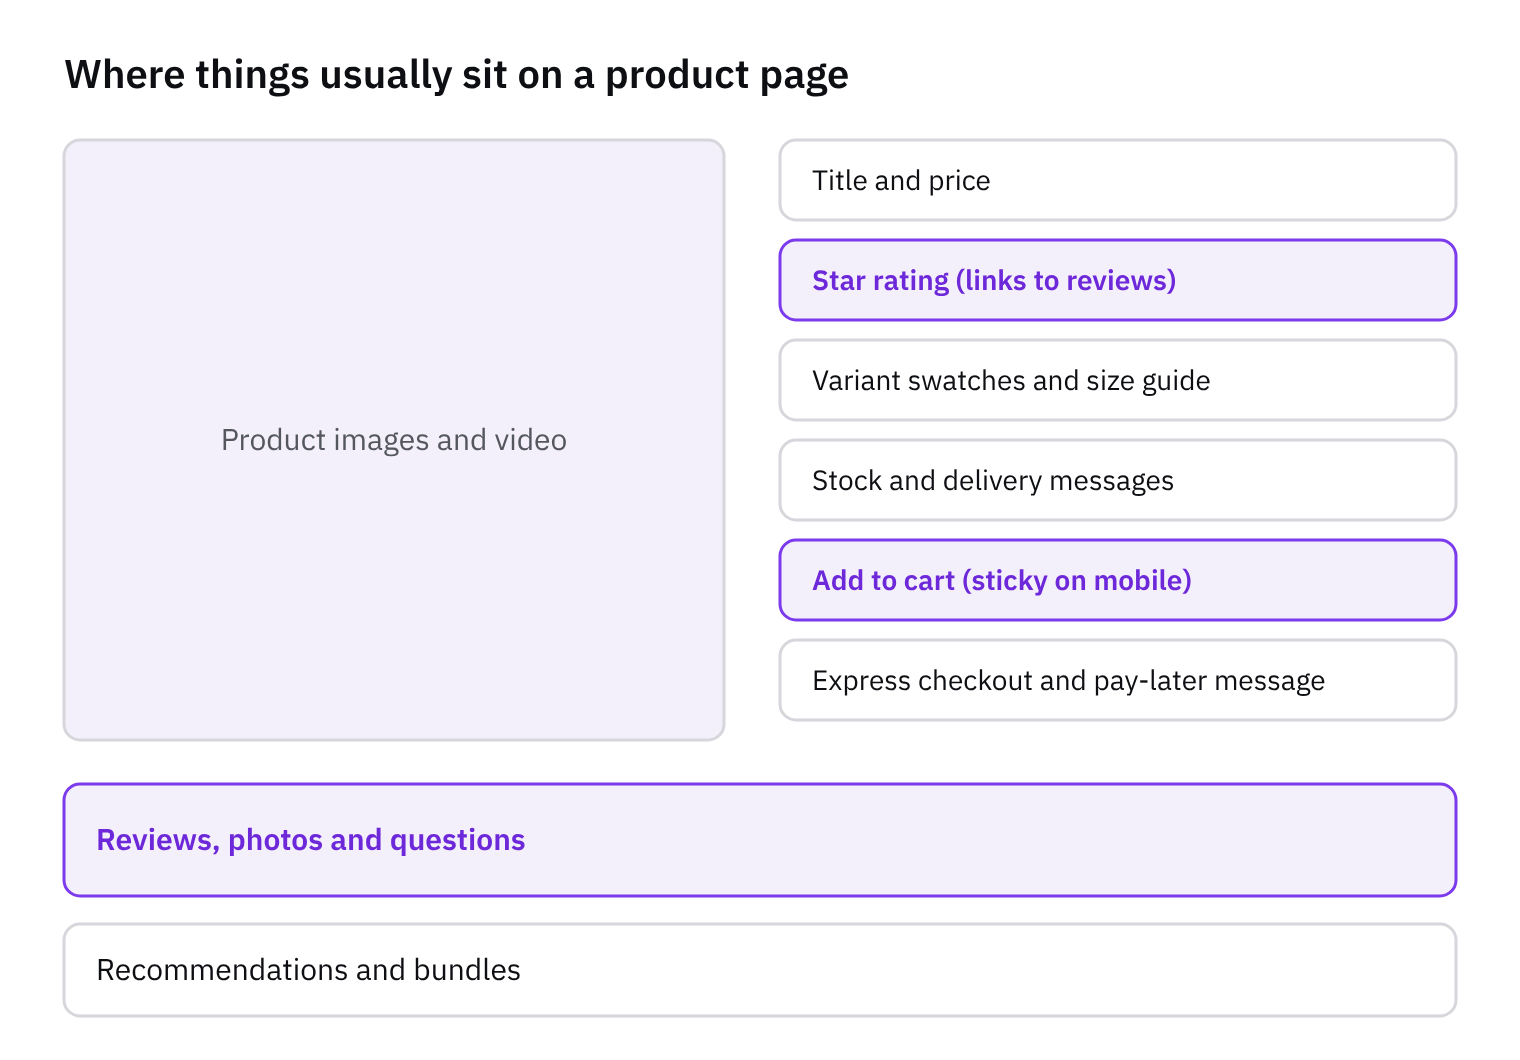
Visitors from social often land on a product page cold. They don't know the brand, and they're probably on a phone. So check that the price, images, variant choice, shipping information and add to cart button all show up without scrolling around or hunting. If someone has to work to find the delivery cost, many will just go back to the feed. Trust cues help here too. Reviews and ratings near the title give a stranger a reason to believe you. This tends to help because people who have never heard of you are looking for proof, not features.
Shopify's themes documentation says different themes give you different styles, layouts and experiences for the products you sell, and that you can customise the store to match your brand. That's a useful prompt: pick or adjust a theme layout that suits what you sell, rather than fighting one that buries the buy box. The Theme Store has both free and paid options, so a better fit doesn't have to mean a big spend.
When you add a reviews or ratings widget, use a theme app extension block in the theme editor rather than pasting code into Liquid. It's easier to move, hide or remove, and it doesn't leave stray code behind if you change apps. In Hydrogen, build the same thing as a component instead. Then do the simplest test of all: open the page on a real phone, on mobile data, and try to buy something. Note every moment you hesitate.
Test checkout like a customer
Before you spend more on ads, buy something from your own store the way a visitor from social would. Open your ad on a phone, land on the page, add to cart and go all the way through payment. Shopify's help documentation has a guide for placing a test order, and a separate one for troubleshooting checkout payment issues. Read both first. If a payment fails in your test, the troubleshooting guide is where you start, not the ad settings.
Stock matters more than you might expect. According to the Shopify Checkout documentation, the cart is checked against your inventory levels each time a customer completes a step, and an error message appears if the stock has become unavailable. Inventory is held only when the customer submits their payment information, and the hold is released if the payment fails. So a busy campaign can leave people with items in their carts that sell out before they pay. Check stock on anything you are promoting. Also look at whether a maximum quantity per cart is set, because that limit can quietly block an order from someone who wants more than you allow.
Two more settings are worth a look. Checkout settings in the admin control how you collect email addresses for promotional marketing, so confirm that what a customer sees is what you intended. If you have an online store, you can also change the look and layout of the checkout pages by editing your theme, which is handy if the checkout feels off-brand after a mobile test. One practical tip: if your ads use cart permalinks (links that pre-fill a cart), click each one from a phone and make sure it still lands on a working cart with the right products. A stale link is an easy way to lose a visitor.
When you finish, write down the earliest point where the journey broke, whether that was tracking, the landing page, the product page or checkout. Fix that first, then run the test order again to confirm it. Only then rerun a small campaign, so you can see whether the fix made a difference before you scale the spend.
Tools in this article
Which of the stores we index use them, by platform, sector and over time.
- Google Tag Manager on 367 stores
Get the weekly digest
One email every Monday: the week’s new guides and articles, plus the Shopify deadlines coming up and what’s been announced. Free, and you can unsubscribe in one click.
Sources
- Shopify Help Center | Analyzing the success of your online marketing campaigns · help.shopify.com · accessed 2 Nov 2026
- Shopify Help Center | Default Shopify reports · help.shopify.com · accessed 2 Nov 2026
- Shopify Help Center | Shopify themes · help.shopify.com · accessed 2 Nov 2026
- Web Vitals | Articles | web.dev · web.dev · accessed 2 Nov 2026
- Shopify Help Center | Shopify Checkout · help.shopify.com · accessed 2 Nov 2026
- Shopify Help Center | Pixels overview · help.shopify.com · accessed 2 Nov 2026
AI-assisted, reviewed by Scott. Every claim is checked against the sources above.